


How to Add Quick Chat in Flutter
Add messaging functionality within minutes


Table of contents
✨ In today's digital age, real-time communication is crucial for businesses and app developers alike. Whether it's for customer support, team collaboration, or just casual conversations, in-app messaging is a must-have feature. That's where ZEGOCLOUD comes in, with its innovative In-app chat feature.
Introducing the new In-app chat feature from ZEGOCLOUD — the ultimate solution for seamless communication within your app!
One of the biggest challenges for app developers is providing a seamless and efficient communication experience for their users. The In-app chat feature from ZEGOCLOUD is designed to solve this problem, by offering a powerful and easy-to-use solution for in-app messaging within minimum lines of code.
With the ZEGOCLOUD In-app chat feature, you can easily add real-time chat functionality to your app. The feature is built on top of the ZEGOCLOUD real-time communication platform, which is designed to handle large numbers of concurrent users and high-traffic loads. This means that your app users will be able to chat with each other in real time, without any lag or delays.
Setup and Configuration:
Create a basic project in Flutter (name like inapp_chat_project ).
Add Packages
Go to the
pubspec.yamlfile of your project.Under the
dependenciessection, add the following three packages:
zego_zimkit:
  git:
    url: https://github.com/ZEGOCLOUD/zego_inapp_chat_uikit_flutter.git
    ref: 0.0.7
- Run
flutter pub getto add all the dependencies in the app.
- Add
.envfile
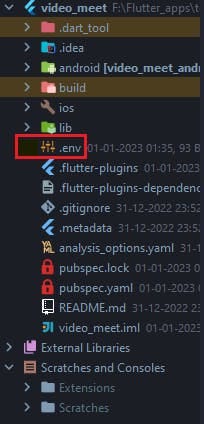
- Make a file named as
.envat the root of your project.
Go to the ZEGOCLOUD Admin Dashboard and an account. Then add
appIdandappSignKeyin.envfile. But how to do that? Don't worry. Click on the following video to see particularly the steps:When you create and open a project, two sections will be visible there.
Project Information
Service Management
From the
Service Management -> In-app-Chatsection, Click onActivatebutton to enjoy the service.
Open
.gitignorefile and write.env..envfile contains secret information. So we are adding this file under.gitignoreso that it will not add to the version control in the future.

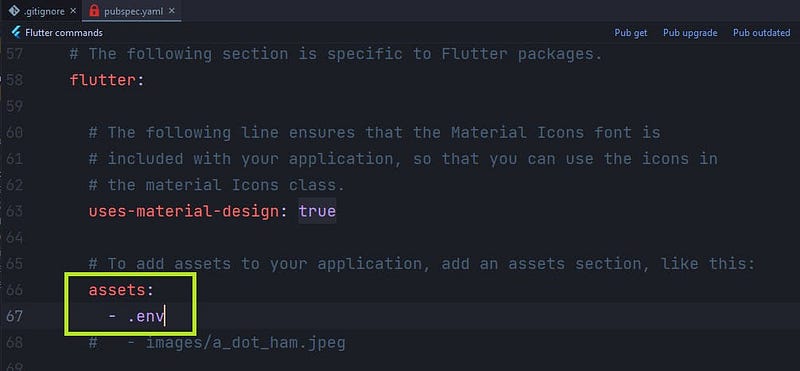
- Include
.envthe file under the assets section ofpubspec.yamlthe file. That will load as assets when we run the project.
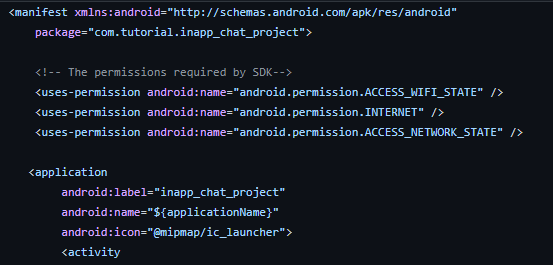
- Add Permissions under the main
android -> app -> src -> main -> AndroidManifest.xmlfile. Add this permission upperside of<application...
tag.
<uses-permission android:name="android.permission.ACCESS_WIFI_STATE" />
<uses-permission android:name="android.permission.INTERNET" />
<uses-permission android:name="android.permission.ACCESS_NETWORK_STATE" />
- Go to the app-level build.gradle (
android -> app -> build.gradle), and change the following
 compileSdkVersion 33
 minSdkVersion 24
 targetSdkVersion 33
- Under the
buildTypes-> releaseof that file, add the following line:
 minifyEnabled true
 proguardFiles getDefaultProguardFile('proguard-android.txt'), 'proguard-rules.pro'

Under the
android-> appfolder, make a file name asproguard-rules.proWrite the following line under that file
-keep class **.zego.** { *; }
Screen Making and Functionality Integration:
Go the
main.dartfile under thelibfolder.Delete all the things and paste the following code:-
import 'package:flutter/material.dart';
import 'package:inapp_chat_project/config.dart';
import 'package:zego_zimkit/services/services.dart';

import 'main_screen.dart';

void main() async{
  await DataManagement.loadEnvFile;
  final _appId = await DataManagement.getSecretData(StoredString.appId);
  final _appSignKey = await DataManagement.getSecretData(StoredString.appSignKey);

  await ZIMKit().init(appID: int.parse(_appId), appSign: _appSignKey);

  WidgetsFlutterBinding.ensureInitialized();

  runApp(const EntryRoot());
}

class EntryRoot extends StatelessWidget {
  const EntryRoot({Key? key}) : super(key: key);

  @override
  Widget build(BuildContext context) {
    return MaterialApp(
      debugShowCheckedModeBanner: false,
      title: 'ZegoCloud InApp Chat',
      builder: (context, child) => MediaQuery(
        data: MediaQuery.of(context).copyWith(textScaleFactor: 1.0),
        child: child!,
      ),
      home: const MainScreen(),
    );
  }
}
👉 Explanation:
We first loading
.envdata file in our app. The first time it can give error. But in 4th step, all errors are resolved automatically.Getting
appIdandappSignKeythat stored in.envfile.Initializing
ZimKitwith that secret keys.Under the
runApp(), we are calling theStatelessclassEntryRoot, where the common entry of every Flutter project exists. Very easy to understand.
3. Now create a file name as main_screen.dart. Paste the following code in that file.
import 'package:flutter/material.dart';
import 'package:flutter/services.dart';
import 'package:inapp_chat_project/dashboard_screen.dart';
import 'package:zego_zimkit/services/services.dart';

class MainScreen extends StatefulWidget {
  const MainScreen({Key? key}) : super(key: key);

  @override
  State<MainScreen> createState() => _MainScreenState();
}

class _MainScreenState extends State<MainScreen> {
  final TextEditingController _userIdController = TextEditingController();
  final TextEditingController _userNameController = TextEditingController();

  void changeSystemNavigationAndStatusBarColor(
          {Color navigationBarColor = Colors.white,
          Color statusBarColor = Colors.transparent,
          Brightness? statusIconBrightness = Brightness.dark,
          Brightness? navigationIconBrightness = Brightness.dark}) =>
      SystemChrome.setSystemUIOverlayStyle(SystemUiOverlayStyle(
        systemNavigationBarColor: navigationBarColor, // navigation bar color
        statusBarColor: statusBarColor, // status bar color
        statusBarIconBrightness: statusIconBrightness,
        systemNavigationBarIconBrightness: navigationIconBrightness,
      ));

  @override
  void initState() {
    changeSystemNavigationAndStatusBarColor();
    super.initState();
  }

  @override
  Widget build(BuildContext context) {
    return Scaffold(
      backgroundColor: Colors.white,
      body: Container(
        width: MediaQuery.of(context).size.width,
        height: MediaQuery.of(context).size.height,
        margin: const EdgeInsets.symmetric(horizontal: 20),
        child: Column(
          mainAxisAlignment: MainAxisAlignment.center,
          children: [
            TextFormField(
                controller: _userNameController,
                cursorColor: const Color(0xff424242),
                decoration: InputDecoration(
                  enabledBorder: _commonBorder,
                  focusedBorder: _commonBorder,
                  border: _commonBorder,
                  filled: true,
                  hintText: 'User Name',
                  fillColor: const Color(0xFFF3F2F2),
                  contentPadding:
                      const EdgeInsets.symmetric(vertical: 17, horizontal: 15),
                )),
            const SizedBox(height: 15),
            TextFormField(
                controller: _userIdController,
                cursorColor: const Color(0xff424242),
                decoration: InputDecoration(
                  enabledBorder: _commonBorder,
                  focusedBorder: _commonBorder,
                  border: _commonBorder,
                  filled: true,
                  hintText: 'User Id',
                  fillColor: const Color(0xFFF3F2F2),
                  contentPadding:
                      const EdgeInsets.symmetric(vertical: 17, horizontal: 15),
                )),
            const SizedBox(height: 15),
            _commonButton('Log in', () async {
              await ZIMKit().connectUser(
                  id: _userIdController.text, name: _userNameController.text);

              Navigator.push(
                  context,
                  MaterialPageRoute(
                      builder: (_) =>
                          DashBoardScreen(userId: _userIdController.text)));
            }),
          ],
        ),
      ),
    );
  }

  _commonButton(String btnName, VoidCallback onTap) {
    return ElevatedButton(
        onPressed: onTap,
        style: ElevatedButton.styleFrom(
            backgroundColor: const Color(0xff0155FE),
            shape:
                RoundedRectangleBorder(borderRadius: BorderRadius.circular(8)),
            padding: const EdgeInsets.symmetric(horizontal: 30, vertical: 10)),
        child: Text(
          btnName,
          style: const TextStyle(color: Colors.white, fontSize: 18),
        ));
  }

  get _commonBorder => OutlineInputBorder(
        borderRadius: const BorderRadius.all(Radius.circular(12)),
        borderSide: BorderSide(
            color: const Color(0xff424242).withOpacity(0.4), width: 2),
      );
}
👉 Explanation:
Make a Stateful Widget name as
MainScreen.From the
initstate, callchangeSystemNavigationAndStatusBarColor(), use to beautify screen layout(Optional).Under the
buildmethod, make aColumnwidget with two common TextField forUser NameandUser Idand also make aloginbutton.When clicking on the Login button, it will connect the user with ZEGOCLOUD Server and Redirect the user to
DashBoard Screenthat we are going to make in the 5th step.
4. Create a file name as config.dart. Add the following code to that file.
import 'package:flutter/services.dart';
import 'package:flutter_dotenv/flutter_dotenv.dart';

class StoredString {
  static const String appId = 'appId';
  static const String appSignKey = 'appSignKey';
}

class DataManagement {
  static get loadEnvFile => dotenv.load(fileName: '.env');

  static getSecretData(String key) => dotenv.env[key];
}

Future<void> copyText(text) async =>
    await Clipboard.setData(ClipboardData(text: text.toString()));
👉 Explanation:
loadEnvFileis used for loading.envfiles when the project starts. That's why it's called fromvoid main()ofmain.dartfile.getSecretDatais used for getting the value from the.envfile with the proper key name mentioned in.envthe file.copyTextused for copying any particular data.appIdandappSignKeyis the key name used in the.envfile. That is also used to get data from.envfiles inmain.dartfile.
5. Now make a new file name as dashboard_screen.dart and paste the following code.
import 'package:flutter/material.dart';
import 'package:inapp_chat_project/config.dart';
import 'package:zego_zimkit/compnents/compnents.dart';
import 'package:zego_zimkit/pages/pages.dart';

import 'chat_options.dart';

class DashBoardScreen extends StatefulWidget {
  final String userId;

  const DashBoardScreen({Key? key, required this.userId}) : super(key: key);

  @override
  State<DashBoardScreen> createState() => _DashBoardScreenState();
}

class _DashBoardScreenState extends State<DashBoardScreen> {
  @override
  Widget build(BuildContext context) {
    return Scaffold(
      backgroundColor: Colors.white,
      appBar: AppBar(
        backgroundColor: const Color(0xff0155FE),
        elevation: 0,
        title: const Text('Chat and Groups'),
        actions: const [ChatPopUpOptions()],
      ),
      body: Column(
        children: [
          _upperSection(),
          _chatAndGroupsVisibleSection(),
        ],
      ),
    );
  }

  _upperSection() {
    return InkWell(
      onTap: () {
        copyText(widget.userId);
        ScaffoldMessenger.of(context)
            .showSnackBar(const SnackBar(content: Text('Copied')));
      },
      child: Container(
        width: MediaQuery.of(context).size.width,
        height: 60,
        alignment: Alignment.center,
        child: Text(
          'User Id: ${widget.userId}',
          style: const TextStyle(fontSize: 16),
        ),
      ),
    );
  }

  _chatAndGroupsVisibleSection() {
    return Expanded(child: ZIMKitConversationListView(
      onPressed: (context, conversation, defaultAction) {
        Navigator.push(
            context,
            MaterialPageRoute(
                builder: (_) => ZIMKitMessageListPage(
                    conversationID: conversation.id,
                    conversationType: conversation.type)));
      },
    ));
  }
}
👉 Explanation:
Here in this screen, we are creating a section where
userIdwill show and tap on it, the user cancopythat id.In another section, all the old chats and groups we participated till now will show. We don’t have to add functionality for that.
ZIMKitConversationListViewthe method from the package will help us to achieve this.ChatPopUpOptionswill show options for connecting with new users and creating and joining new groups. That functionality we are going to make in the next step.
6. After that, you just make a file name as chat_options.dart and this is the last file of that project. Paste the following code there.
import 'package:flutter/cupertino.dart';
import 'package:flutter/material.dart';
import 'package:zego_zimkit/zego_zimkit.dart';

class ChatPopUpOptions extends StatefulWidget {
  const ChatPopUpOptions({Key? key}) : super(key: key);

  @override
  State<ChatPopUpOptions> createState() => _ChatPopUpOptionsState();
}

class _ChatPopUpOptionsState extends State<ChatPopUpOptions> {
  @override
  Widget build(BuildContext context) {
    return PopupMenuButton(
      shape: const RoundedRectangleBorder(
          borderRadius: BorderRadius.all(Radius.circular(15))),
      position: PopupMenuPosition.under,
      icon: const Icon(Icons.more_vert_rounded),
      itemBuilder: (context) {
        return [
         PopupMenuItem(
           value: 'New Chat',
           child: const ListTile(
             leading: Icon(CupertinoIcons.chat_bubble_2_fill),
             title: Text('Create New Chat', maxLines: 1,),
           ),
           onTap: (){
             ZIMKit().showDefaultNewPeerChatDialog(context);
           },
         ), PopupMenuItem(
           value: 'Create New Group',
           child: const ListTile(
             leading: Icon(CupertinoIcons.group_solid),
             title: Text('Create New Group', maxLines: 1,),
           ),
           onTap: (){
             ZIMKit().showDefaultNewGroupChatDialog(context);
           },
         ), PopupMenuItem(
           value: 'Join New Group',
           child: const ListTile(
             leading: Icon(Icons.group_add),
             title: Text('Join New Group', maxLines: 1,),
           ),
           onTap: (){
             ZIMKit().showDefaultJoinGroupDialog(context);
           },
         ),
        ];
      },
    );
  }
}
👉 Explanation:
In this file, we are making three options for the user.
1. Users can directly connect with someone with their
user ID.2. Users can create a new group with a custom group id and invite any other new user with their user id.
3. Users can join another group with a group id.
All of the functionality will take care of by the package itself. You have to just call the specific method.
And that’s done. In-app chat functionality is integrated.
🎉 Now Run the project and have fun.
🙏 Hope that blog helps you. Don't forget to like ♥ that blog.
🙋♂️ Want to see the clip of the result? Here is the clip for you.
🔥 See the youtube tutorial for making this: https://youtube.com/watch?v=_1dtWcipeLE&feature=shares
🎉 Source Code: https://github.com/SamarpanCoder2002/Built-In-App-Chat-in-Flutter
👉 Get 10,000 free mins for the chat app: https://bit.ly/3w8nush
👉 Find out more about ZEGOCLOUD: https://bit.ly/3vepTBl
👉 How to make a chat app: https://bit.ly/3iO5OyX